 krites
 Orienteering
I installed my own photo culler the wrong way, got three steps into my own tutorial, and walked into a wall my own documentation had put a warning box in front of. In fairness to the documentation, it’s a good warning box. In fairness to me… go install is what your fingers do when the thing’s written in Go and you’ve typed that command four thousand times.
What I got was a working krites binary that culled a shoot perfectly happily and then, when I asked it for the studio, served me a very polite page explaining that the studio UI wasn’t built into this binary. Which is exactly what the docs say will happen, in a box, in bold, a few lines above where I’d stopped reading.
So that’s where this starts, because it’s the one step in the whole walkthrough that can cost you an evening. Everything after it is twenty-odd minutes, and nothing you do in it can hurt your originals.
The short version of what krites does: you point it at a folder of frames and it gives every one of them a verdict, keep or maybe or reject, and tells you why it decided that. It groups the bursts too, so you’re not squinting at ten near-identical frames trying to work out which one has both sets of eyes open. And then it gets out of the way, because the judgement’s yours and the tool’s only there to stop you making it four thousand times from cold.
This is the canonical walkthrough from the krites docs, reproduced here so the two don’t drift. The docs are the source of truth: https://krites.phpboyscout.uk/tutorials/cull-a-shoot/. Every command and every output below was run against v0.9.0 before this went out, bar the one RAW claim in step 6, which says so itself. The setup and
resetbehaviour were checked again on v0.10.2 when the docs caught up with them.The frames are real: forty-four out of Lyndsey and Denis’s wedding, shot by my wife Hailey at Echos Photography. Hailey and the couple have agreed to them turning up here, which for a tool whose whole pitch is that your clients’ photographs never leave your machine isn’t a detail I was going to skate past. I worked on a copy, so nothing here wrote a byte into her actual shoot.
1. Install it, and not the way I did
The studio’s web assets are built by a go generate step and baked into the binary. go install and a bare go build skip that step, so you get the placeholder page I got. A release build is what you want.
If you’re on a Mac, take the .dmg and ignore the rest of this section. Krites_<version>_arm64.dmg from the latest release, drag it into Applications, done. It’s signed and notarized, so none of that unidentified-developer nonsense. The ONNX runtime the local analysis wants is bundled inside it, so there’s nothing else to go and install. And double-clicking it starts the studio and opens your browser for you; click it again a week later and it reopens the one you’ve already got running rather than starting a second, with Shutdown krites in the studio settings when you want it gone. I’d take that route even on a machine where I was perfectly happy in a terminal. Apple Silicon only, mind, so on an Intel Mac take krites_Darwin_x86_64.tar.gz and follow the CLI route below.
Everywhere else, or if you’d genuinely rather stay at the command line, the install script fetches the right archive and drops the binary in ~/.local/bin:
curl -fsSL https://gitlab.com/phpboyscout/krites/-/raw/main/install.sh | bash
Whichever way you went, there’s nothing to set up after it. The first command you run writes a default config to ~/.krites/config.yaml, and it’s a short file. The wedding-default cull profile everything below leans on is built into the binary rather than written into that config, so don’t go hunting for it in there. I did, for longer than I’d like to admit. krites init still exists, and from a terminal it’ll offer to set up GitLab and SSH keys as well, but you don’t need it to follow along.
2. Register the shoot
krites keeps no catalogue of its own. It works on a shoot: your originals, plus a .krites/ sidecar it puts down beside them.
krites ingest ~/Pictures/lyndsey-denis
Registered shoot "lyndsey-denis" — 44 frames (~/Pictures/lyndsey-denis)
Ingest scans the folder, records each frame and sets the sidecar up. It only ever reads your files. From here on, pass --shoot ~/Pictures/lyndsey-denis, or just run the commands from inside that directory.
3. Judge every frame
krites cull --shoot ~/Pictures/lyndsey-denis
Shoot "lyndsey-denis" — 44 frames
  keep 10   maybe 28   reject 6

  keep   DSC07925.jpg
  maybe  DSC07926.jpg  — near-duplicate of DSC07925.jpg (kept the sharper frame)
  maybe  DSC07927.jpg  — near-duplicate of DSC07925.jpg (kept the sharper frame)
  reject DSC07929.jpg  — blown highlights (11% over 10%)
  reject DSC07930.jpg  — blown highlights (11% over 10%)
  ...
  maybe  DSC07935.jpg  — near-duplicate of DSC07937.jpg (kept the sharper frame)
  keep   DSC07937.jpg
Forty-four frames took a minute and three quarters on my machine, so a full wedding is the sort of thing you kick off and go and put the kettle on for.
It’s the right-hand column that does the work here. Every verdict comes with its reason and the number behind it, so when it rejects one you liked you can see whether it misread the frame or whether you did. Sharpness and motion blur, exposure, and, with the face and eye provider enabled, closed eyes and blinks.
None of it touches your photos. The verdicts are records in the sidecar, nothing more. The judgement itself comes from that wedding-default profile, and its thresholds are yours to tune once you’ve got an opinion about them.
Then look at what it grouped:
krites dedup --shoot ~/Pictures/lyndsey-denis
Shoot "lyndsey-denis" — 6 burst(s)

  burst of 3 — kept DSC07925.jpg
      ★ DSC07925.jpg
        DSC07926.jpg
        DSC07927.jpg
4. Review in the studio
The studio is where krites is really meant to be driven from, and it’s a local web UI over the same shoot files:
krites studio
It takes no --shoot flag, which threw me for a moment until I remembered why: unlike the CLI it isn’t scoped to one shoot, it opens onto a library of them and you pick. If the one you just ingested isn’t in the list, add it with Browse… on the Shoots page. Mine wasn’t, so that line in the docs is doing real work.
Then it’s the cull grid, which is where you’ll actually spend your time: confirming the keepers, rescuing whatever the profile was harsh on, binning the rest. Each frame carries a colour-coded verdict stripe down its left edge, a rating chip if you’ve starred it, and a burst marker if it belongs to a cluster.
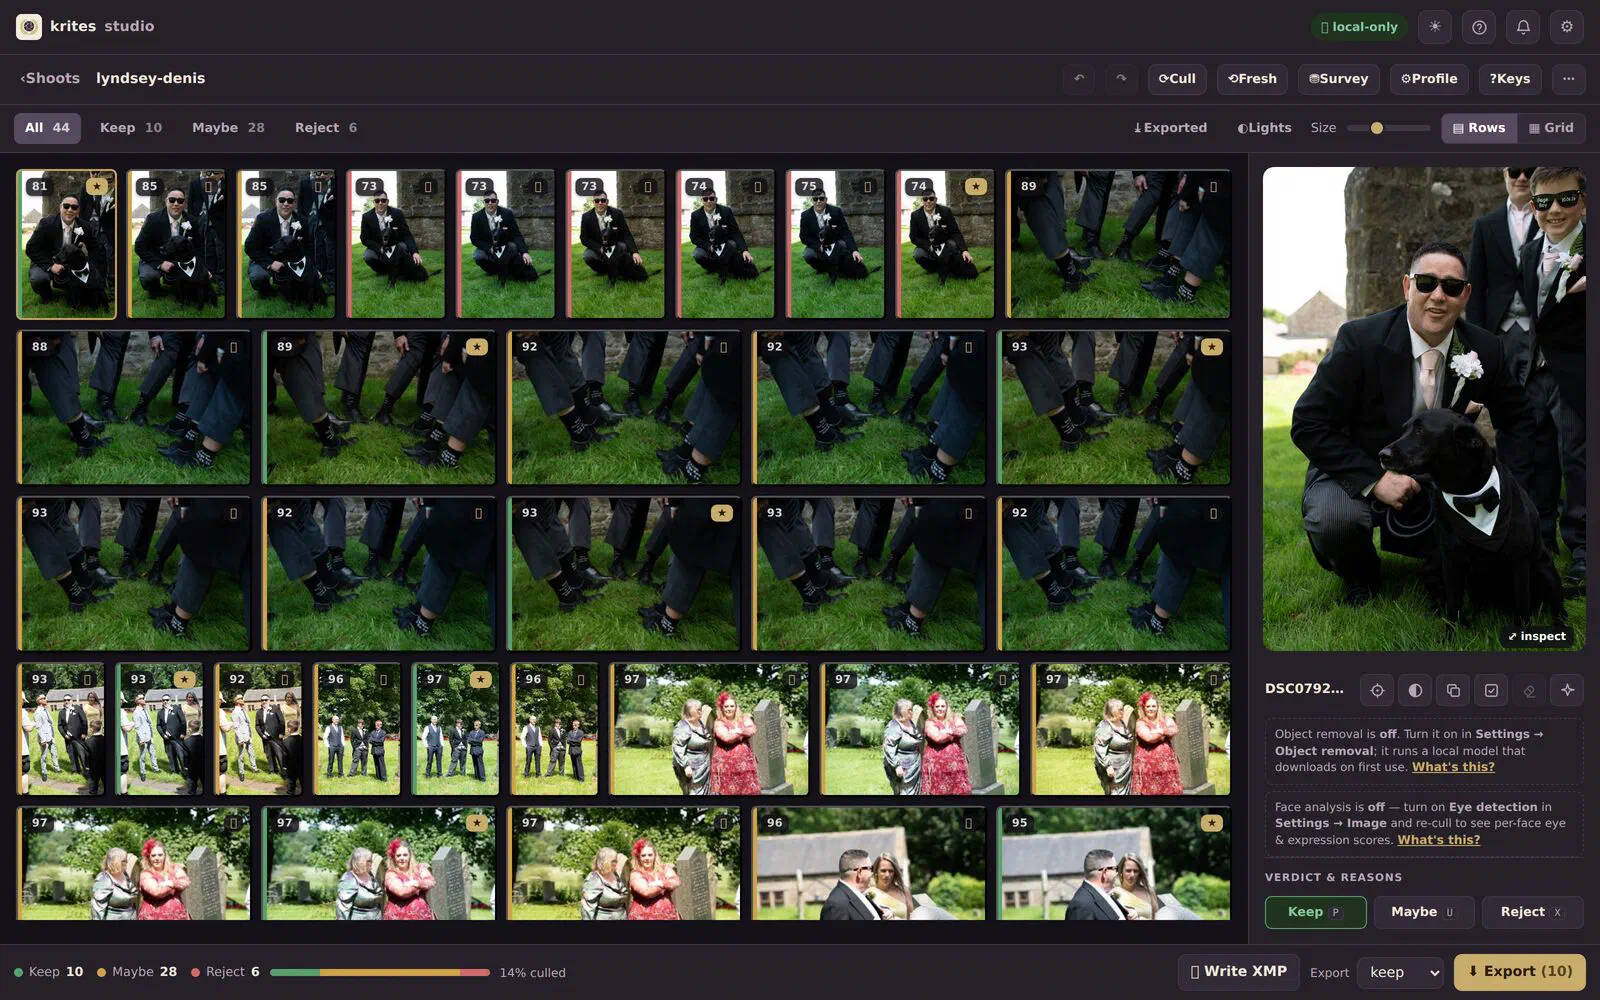
That run of near-identical frames along the top row is the burst the cull was on about: the groom and the dog, eight times over, and the one it kept has the gold ring round it. Eight frames, one decision… and it’s exactly the sort of decision I’d have stopped making carefully somewhere around frame three thousand.
The grid defaults to justified rows, full uncropped frames at a consistent height with your shot order kept, the way a Lightroom filmstrip lays out. The Rows / Grid toggle swaps it for a dense cropped-to-fill lattice and remembers which you picked.
If you’d rather stay in the terminal, or you’re scripting a correction, override a single frame directly:
krites verdict DSC07926.jpg keep --shoot ~/Pictures/lyndsey-denis
DSC07926.jpg → keep (manual override)
That one sticks, too. A manual verdict survives a re-cull, so tuning the profile later won’t undo a call you made by hand.
5. Correct the keepers
On the keepers, krites proposes edits, and every one of them is a reversible record rather than a change to the file:
krites straighten DSC07926.jpg --shoot ~/Pictures/lyndsey-denis   # level horizon
krites crop       DSC07926.jpg --shoot ~/Pictures/lyndsey-denis   # composition crop
krites develop    DSC07926.jpg --shoot ~/Pictures/lyndsey-denis   # apply a look
straighten tells you what it found and what it proposes doing about it, and all three work that way:
Shoot "lyndsey-denis" — straighten
  DSC07926.jpg  +8.00° (detected -44.01°)
Which is a decent illustration of why these are proposals rather than instructions. It reckoned that frame was forty-four degrees out, which it very much isn’t, and offered me eight anyway. I wouldn’t take it… and nothing has happened to the photograph either way, so there’s no harm done in it having asked.
develop is the quiet one of the three for now. The only look krites ships is neutral, which changes nothing, so it’s there for the shape of the pipeline more than for anything it does to a frame. The docs say as much.
Made a wrong call on a frame? Undo everything on it:
krites reset frame DSC07926.jpg --shoot ~/Pictures/lyndsey-denis
Everything means everything, though, and that includes the verdict. The frame goes back to how it was straight after ingest, unjudged, and export only takes keepers, so the next export leaves it out without a word. That’s the frame I overrode to a keep a minute ago, so if you ran both, your export below will say 10 where mine says 11. Running krites cull again won’t necessarily bring it back either, because the profile only ever had it down as a maybe. Give it its verdict again with krites verdict before you export.
It’s still a proper safety net. Nothing you’ve done has gone anywhere near the original, and there’s no mistake in here that needs a re-import to get out of. It just takes the keep away along with the edits.
6. Export
krites export --shoot ~/Pictures/lyndsey-denis
Exported 11 keep frame(s) to ~/Pictures/lyndsey-denis/export
Export is the only step that writes pixels. It renders the keepers with every edit baked in, in the order removals then straighten then crop then look, into the shoot’s export/ directory. Run it as often as you like, the same records give you the same output every time.
The bit I wouldn’t have guessed, so I went and checked it: a frame with no edits and no resize is copied verbatim. I ran cmp over one of Hailey’s, a 19,887,969-byte frame, and what came out the other end was byte-for-byte the original. Not a re-encode costing her a generation of quality on every pass, which is the sort of thing you only notice three exports later! Which is also why eleven frames exported in under a second, since most of that job was a file copy. A frame that does carry an edit gets re-rendered, as you’d expect.
RAW is the one thing here I didn’t exercise, since the shoot I was handed is JPEGs. The documented behaviour is that a RAW frame always renders, as a JPEG off its embedded preview, so IMG_2043.CR2 exports as IMG_2043.CR2.jpg. I’ve no reason to doubt it and no test of my own to offer you, so take that one from the docs rather than from me.
7. Hand the cull to Lightroom
Writing sidecars is its own command, because export renders pixels and doesn’t write XMP:
krites xmp write --shoot ~/Pictures/lyndsey-denis
Wrote 44 XMP sidecar(s) beside the originals in ~/Pictures/lyndsey-denis
That puts an .xmp beside each original carrying its verdict as a star rating and a colour label, plus the crop and the straighten angle on any frame you corrected. Point Lightroom at your originals and the cull’s sitting there waiting for you. If you want the reasoning behind that ten-line packet, I wrote it up separately.
The look doesn’t travel, and neither do object removals, because Camera Raw’s XMP can’t express either of them. If a keeper needs one of those in Lightroom, import the rendered file out of export/ rather than the original.
What you just did
You’ve taken a shoot from import through to an album-ready export without altering an original: every verdict and every correction was a record you could throw away, and only that last export put a pixel anywhere. From here, tune the profile until its taste is closer to yours, or read why it judges the way it does.
The photographs, meanwhile, are exactly where you left them, byte for byte… which is the one part of all this I’d genuinely lose sleep over getting wrong.